Friday, May 2, 2008

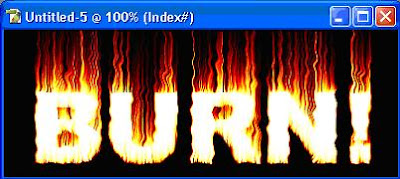
Text Effect: Burning Fire


Operating System : MS Windows XP
Application : Adobe Photoshop CS or newer

1. Click on the Default Foreground and Background Colors (D) in the toolbox to make the color black/white, then click the Switch Foreground and Background Colors (X) in the toolbox to make the color white/black.


2. Choose File>New with height: 150 pixel, width: 400 pixel, resolution: 72 pixels/inch, mode: Grayscale, and background contents: Background Color.


3. Choose Horizontal Type Tool (T) from the tool box, set font: Arial Black and size: 100 point (from the option bar).

4. Click on the canvas and type “BURN!” (without quotation marks).

5. Use Move Tool (V) in the tool box to move the text a little bit lower.

6. Choose Layer>Flatten Image to merge all the layers into one layer.
7. Choose Image>Rotate Canvas>90 CCW to rotate the canvas 90 degree counter clock wise.
8. Choose Filter>Stylize>Wind... with direction: From the Right, click OK.

9. Choose Filter>Wind two times.

10. Choose Image>Adjustments>Invert to inverse the color (black/white).
11. Choose Filter>Wind.

12. Choose Image>Rotate Canvas>90 CW (rotate the canvas 90 degree clock wise) to return its normal state.

13. Choose Image>Adjustments>Invert to inverse the color to its normal state (white/black).

14. Choose Filter>Distort>Ripple… with amount: 80, size: Medium, click OK.

15. Choose Image>Mode>Indexed Color to change the color mode from grayscale to indexed.
16. Choose Image>Mode>Color Table… with table: Black Body, click OK.

Text Effect: Picture Inside

Operating System : MS Windows XP
Application : Adobe Photoshop CS or newer

1. Choose File>New with height: 150 pixel, width: 300 pixel, resolution: 72 pixels/inch, mode: RGB Color, and background contents: White.
2. Choose Horizontal Type Tool (T) from the tool box, set font: Arial Black and size: 80 point (from the option bar).

3. Click on the canvas and type “DUNE” (without quotation marks).

4. Choose Edit>Free Transform, then drag the handle to resize the text bigger.

5. After that, press ENTER on your keyboard to confirm the changes.
6. Choose Layer>Rasterize>Type.
7. Choose Select>All, Edit>Cut and Edit>Paste to center the text.
8. Choose File>Open... to choose the picture to place inside the text. (For this example, I use DUNE.TIF on Program Files\Adobe\Photoshop\Samples.) Then click Open to load the file.
9. Choose Select>All, Edit>Copy to copy the picture into the clipboard.
10. Choose File>Close to close the picture.
11. Choose Select>Load Selection... then click OK to display the selection around the text.

12. Choose Edit>Paste Into to place the picture inside the text.

13. Choose Move Tool (V) on the tool box then drag the image inside the text as you desire.

Thursday, May 1, 2008

Text Effect: Rough Gold


Operating System : MS Windows XP
Application : Adobe Photoshop CS or newer

1. Choose File>New, set height: 100 pixel, width: 300 pixel, resolution: 72 pixels/inch, mode: RGB Color and background contents: White.

2. Set foreground color to R:220, G:180, B:0.

3. Choose Horizontal Type Tool (T) from the tool box, set font:Arial Black and size:80 point (from the option bar).

4. Click on the canvas and type “GOLD” (without quotation marks).

5. Choose Layer>Rasterize>Type.

6. Choose Select>All, Edit>Cut and Edit>Paste to center the text.


7. Choose Filter>Noise>Add Noise... to add some noises with amount:20, distribution: Gaussian, choose OK.


8. Finally choose Filter>Render>Lighting Effects.. with texture channel: Red, height: 8 and choose OK.

Work Area in Photoshop

Operating System : MS Windows XP
Application : Adobe Photoshop CS or newer

Photoshop usually consists of :

1. Menu bar at the top of the work area.

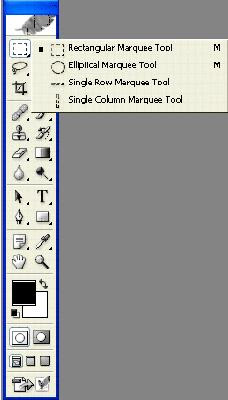
2. Tool box—the long, narrow palette on the far left side of the work area—contains selection tools, painting and editing tools, foreground- and background-color selection boxes, and viewing tools. A small triangle in the lower right corner of a button is your clue that other tools are available but hidden under that tool. To activate it just press and hold the button to display more tools beneath under it.

3. Tool options bar—below the menu bar, has the options for the tool in tool box. For example, if you choose Zoom tool then the option bar will display Zoom In and Zoom Out options.


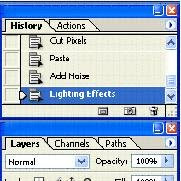
4. Palettes—the collection of Photoshop feature to do image processing that usually appears on the far right side of work area (excluding the toolbox). You can display/hide the palette by using Window menu bar. You can use History palette to undo, just click on the previous action to undo.

5. Image windows, which you open separately.

Getting Started with Photoshop

Operating System : MS Windows XP
Application : Adobe Photoshop CS or newer

Before we started, then we should set up the Photoshop for getting the best result :

1. Start your Photoshop.

2. Immediately press and hold CTRL+ALT+SHIFT on your keyboard to display the confirmation dialog box that says “It will delete your Photoshop setting”, choose Yes.

3. Then come up another dialog box that says “You need to set up your Photoshop paging file”, choose OK.

4. Then come up another dialog box that says “You need to set up your Photoshop color settings”, choose No.

5. Finally come up the welcome screen, just choose OK.

6. Now we will need to set up the paging file, choose Edit>Preferences>Plug-Ins & Scratch Disks…

7. Just use the following setup for your configurations. Please take a note that you will need to set the first scratch disk to your drive with many free spaces. Also the amount of drives available here depends on your drive partition. If you have 4 drive partitions (C,D,E,F) then you can use all of them.

8. Now you are ready to work with Photoshop.

NOTES :

- Paging file (scratch disks), works like virtual memory for Windows XP. It works like a secondary RAM for processing images in Photoshop so we need to put it on the drives which has a lot of free space.